How to Lighten Your Backpack for Free?

Spread the love

So, you’ve decided to venture into the great outdoors. You’ve got the boots, the questionable fashion sense involving zip-off trousers, and a heart full of wanderlust.

But have you met your new arch-nemesis, the improperly fitted backpack?

Let’s talk about it. This isn’t just a bag; it’s a sherpa, a tortoise shell, a portable storage unit for your life.

And if you treat it like a gym bag you sling over one shoulder, it will exact a terrible, twisting, pain-filled revenge.

I learned this the hard way, and my shoulders have yet to forgive me.

The purpose of this little guide is to ensure you don’t end up like I did—a crumpled, groaning mess at the end of a trail, vowing to never leave my sofa again.

This is all about how to fit a hiking backpack properly. It becomes critically important once you’re carrying more than 10-15 kg (that’s 22-33 lbs for my fellow imperially-challenged friends). 

Table of Contents

1. Choosing the Right Backpack: Don't Be a Dumb-...Don't Be Like I Was

A. Get a Pack with an Internal Frame

Remember those external frame packs your dad had that made him look like a bizarre, neon-colored robot?

Those are mostly relics now, and for good reason. For carrying anything over about 10 kg, you need an internal frame.

Think of the internal frame as the skeleton of your pack. It’s usually made of lightweight aluminum or plastic stays that are sewn inside the fabric.

This genius invention allows the weight to be strategically balanced between your hip belt and your shoulder straps.

It hugs your body, making you one with your load, a graceful, weight-bearing gazelle.

Without an internal frame, all that weight—the tent, the food, the 12-pack of craft beer you insisted was necessary—dangles directly from your shoulders.

After about five minutes, your shoulders will feel like they’ve been used as anvils. After an hour, your back will join the chorus of complaints.

It’s a symphony of pain, and you are the unwilling conductor.

B. Look for Adjustable Torso Length

This is, without a doubt, the single most important feature most beginners (like Past Me) completely ignore.

Your torso length is not your height. I’m 6 feet tall, but my torso is oddly stumpy, like a Greek god sculpted by a kindergartener.

An adjustable torso length means the entire shoulder harness—the point where the straps attach—can move up or down a few inches.

You’ll usually find a sneaky bit of velcro or a slider mechanism on the back of the pack. Undoing it allows you to shift the whole contraption to match your unique, beautiful proportions.

Getting this right is the difference between the pack carrying you, and you carrying the pack like a grumpy pack mule.

How to Measure Your Torso Length (A Fun, Slightly Awkward Party Game!)

Grab a soft measuring tape and a friend whose discretion you trust. If no friends are available, a tree and a stick to make marks will do.

This will feel ridiculous. Embrace it.

  1. Find Your Iliac Crest: Stop giggling. This is just the fancy term for the top of your hip bones. Put your hands on your hips (like you’re striking a sassy pose). The hard ridge your thumbs are resting on? That’s the spot.
  2. Identify the Midpoint: Imagine a line connecting these two bony prominences. Now, find the midpoint of that line on your spine. This is your starting point.
  3. Locate the C7 Vertebra: Tilt your head down like a turtle retreating into its shell. The knobbly, prominent bone that sticks out at the base of your neck? That’s C7. If you feel a bunch of bones, the one that sticks out the most when you tilt your head is your guy. This is your finishing point.
  4. Measure the Distance: Have your (snickering) friend measure from the midpoint of your hips, straight up your spine, to the C7 vertebra. This number, in centimeters or inches, is your torso length.
  5. Pro Tip: Don’t suck in your gut. The trail doesn’t care about your abs, and an inaccurate measurement here will haunt you for miles.

2. The Four Key Features of a Well-Fitting Backpack: The Holy Quadrinity

To achieve nirvana on the trail, your backpack needs to have these four components, and they all need to be playing for the same team. Imagine them as the Beatles of comfort.

1) The Padded Hip Belt (Your New Best Friend)

This is not a suggestion; it is the law. About 80-90% of your pack’s weight should be carried by your hips.

Your hips are strong, structural pillars. Your shoulders are wimpy, string-like accessories in comparison.

The hip belt must be thick, well-padded, and robust. When you try on a pack, you should feel like the belt is giving you a supportive, weight-bearing hug around your iliac crest, not your squishy waist.

2) Quality Shoulder Straps (The Supportive Sidekicks)

These should be height-adjustable (see above!), generously padded, and contoured to fit your body.

They are not the primary load-bearers; they are there for stability, to keep the pack from flopping backwards like a sad turtle.

They should feel comfortable and secure without digging in.

3) The Adjustable Chest (Sternum) Strap (The Stabilizer)

This little strap connects the two shoulder straps across your chest.

Its job is simple but vital: to prevent the shoulder straps from sliding off your arms every time you do a dramatic gesture about the beauty of a sunset.

It should sit comfortably across your breastbone or just below, snug enough to stabilize but not so tight you sound like a squeaky toy when you breathe.

4) Load Lifters (The Secret Weapons)

These are the straps that attach to the top of the shoulder straps, near your collarbone, and angle back to the top of the pack itself.

Most beginners ignore them, which is a tragic mistake. Their purpose is to pull the top of the pack closer to your back.

When adjusted correctly, it feels like the pack is standing up straighter, balancing the weight perfectly.

It’s the difference between the pack feeling like a lazy sloucher and an attentive dance partner.

3. Match Your Backpack to Your Gear and Season: Don't Bring a Knife to a Gun Fight

A. For Light or Summer Gear

If you’re a ultralight enthusiast or just going for a summer overnight, your gear is probably small and light.

A smaller, less-structured pack (30-50 liters) is perfect. It’s like wearing a comfortable hoodie. It doesn’t need the same rigid frame and beefy hip belt as its bigger brothers.

B. For Heavy or Winter Gear

Winter camping? Multi-day trekking? You’re carrying a bulkier shelter, a warmer (and therefore heavier) sleeping bag, and more food.

You need a beast of a pack (60-80+ liters). This is the pack’s muscular big brother, with a thicker hip belt, heavy-duty straps, and a more rigid frame to handle the load without whimpering.

It’s like comparing a pickup truck to a sports car. You need the pickup to haul the lumber.

4. Gender-Specific Packs: It's Hip to Have Hips

This one is for the ladies, though the men should read it too so they can be better hiking partners.

Many brands now make women-specific backpacks, and they are not just a “shrink it and pink it” marketing gimmick.

Women’s packs are typically designed with:

  • Shorter torso lengths.
  • Narrower shoulder straps that are shaped to accommodate a woman’s chest.
  • A hip belt that is curved more dramatically to sit on the female iliac crest, which is generally wider and set differently than a male’s.

As a guy, I can’t speak from personal experience, but every female hiking partner I’ve had has sworn by the difference a properly designed women’s pack makes.

It’s an ergonomic design that reduces pressure points and increases comfort exponentially over long distances.

If you’re a woman, please, for the sake of your comfort, at least try a women-specific model.

5. Check Reviews Before Buying: Learn from the Suffering of Others

Never, ever buy a backpack without reading a mountain of reviews. This is your digital crystal ball.

You get to see into the future and avoid the pain that others have endured.

Look for recurring themes. Is there a common complaint about a buckle breaking? Or, the most insidious of all, straps that loosen after a few kilometers?

Imagine the sheer, unadulterated frustration of having to stop every ten minutes to re-tighten a hip belt that has decided it no longer wishes to participate in the hike.

It will drain your soul faster than running out of coffee.

My tip: If you see multiple reviews mentioning the same durability or design flaw, run.

That pack is a fair-weather friend and will abandon you in your hour of need.

6. How to Adjust Your Backpack for a Perfect Fit: The Main Event

Alright, you’ve bought the right pack. You’ve read the reviews. You’ve measured your torso (you did measure it, right?).

Now, let’s get this thing fitted. This is a sacred ritual. Perform it with care.

Step 1: Set the Correct Torso Length

Remember that torso measurement we did? Mine is 43-45 cm. Now, find the adjustment mechanism on your pack.

It’s usually on the back, hidden away. Adjust the shoulder harness so the marked measurement aligns with your number.

The goal is to have the midpoint of the hip belt sit directly on top of your hip bones. If the pack is set to 47 cm and you’re a 44, lower it.

This is the most critical macro-adjustment you will make.

Step 2: Loosen All Straps

Before you put the pack on, be a chaos agent. Loosen every single strap. The hip belt, the shoulder straps, the chest strap, the load lifters.

Give it a good shake. Start from a place of total slack, a blank canvas of adjustability.

Step 3: Adjust the Hip Belt (The Throne of Power)

Put the pack on. Now, with great purpose and determination, buckle the hip belt and tighten it firmly around your hip bones.

I mean it. Really crank it down. It should feel snug, maybe even a bit uncomfortable if you’re new to this.

You should feel the padding cupping your iliac crest. At this point, if you loosen your shoulders, the pack should basically stay put. This is what victory feels like.

A word of warning: if you’re new to this, you might get some minor bruising on your hips. It’s a rite of passage.

Bring Leukotape or mole-skin to protect any hotspots. Your hips are the pack’s throne; make sure it sits right.

Step 4: Adjust the Shoulder Straps (The Gentle Embrace)

Now, and only now, reach for the shoulder straps. Pull them until they contour nicely to the curve of your shoulders, but they should still be slightly loose.

You should be able to slide a finger or two comfortably between the strap and your collarbone.

If you overtighten these, you’ll pull the weight back onto your shoulders, betraying the entire purpose of the hip belt.

They are for stability, not for bearing the load.

Step 5: Adjust the Chest (Sternum) Strap (The Unifier)

Slide the chest strap up or down until it sits comfortably across your chest, about an inch below your collarbones.

Buckle it and snug it up. It should be tight enough that the shoulder straps feel secure, but not so tight that you feel constricted or have difficulty breathing deeply or moving your arms.

Do a little chicken dance to test it. You’re welcome.

Step 6: Adjust the Load Lifters (The Final Touch of Genius)

Now for the magic. Find those angled straps near your collarbones. Gently pull on them. Watch as the top of the pack magically tilts forward, hugging your back.

You want to tighten them until the pack feels balanced and close to your body, but not so much that you feel the shoulder straps being pulled backwards and into your neck.

The correct feeling is that the weight is being transferred down through the frame and into your hips.

If you suddenly feel like the weight has vanished from your shoulders and is being supported by your powerful legs and glutes, you’ve done it right. You have achieved enlightenment.

You will likely need to do a little dance, walking around and re-tweaking each strap a few times until everything feels perfectly balanced.

This is normal. You are fine-tuning a complex system.

Final Thoughts and Personal Note

I really, really wish someone had sat me down and explained all this when I started. My early hiking career was a monument to poor planning and masochism.

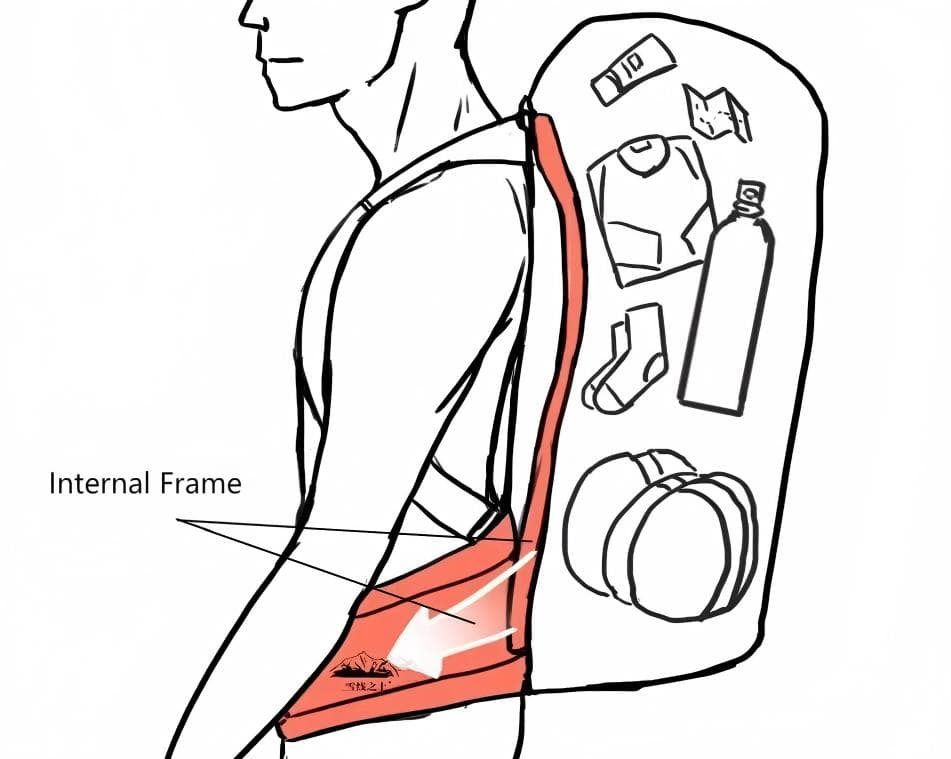
I once carried a 20 kg pack on a three-day trip with a pack that had less structure than a wet noodle.

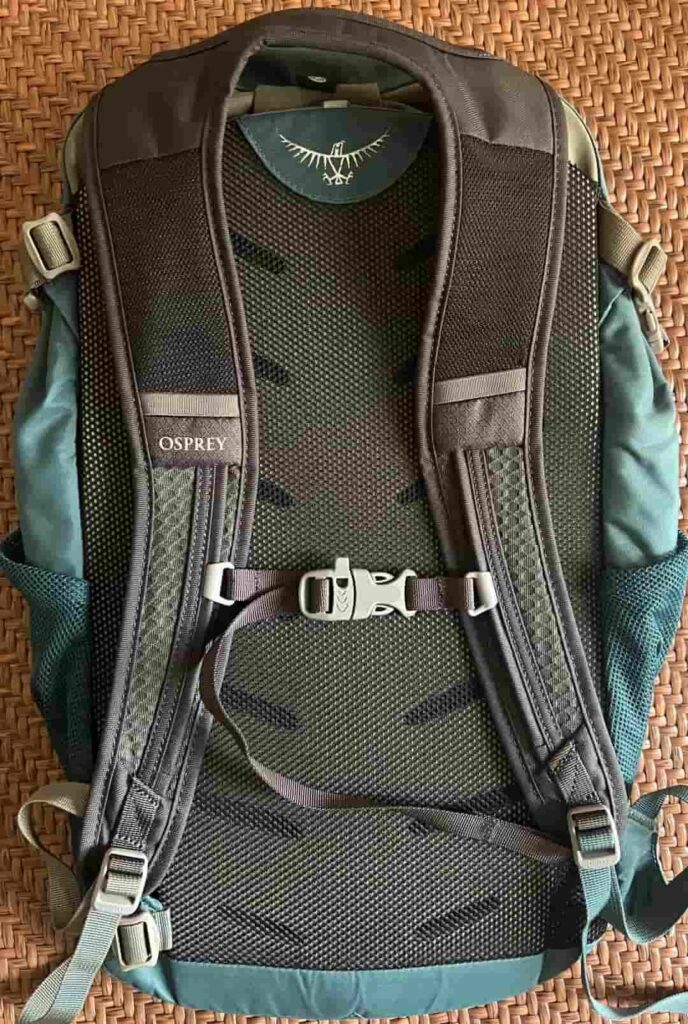
The hip belt was a flimsy piece of nylon, and I, in my infinite wisdom, thought the shoulder straps were for carrying everything.

The pièce de résistance? I had decided that a six-pack of glass-bottled local beer was a non-negotiable luxury.

That clinking, shifting, monstrous load, combined with a pack that was essentially a fabric sack, destroyed my back.

I spent the final day of that hike walking like a question mark, my spirit broken, my shoulders on fire, vowing to take up a nice, safe indoor hobby like competitive eating.

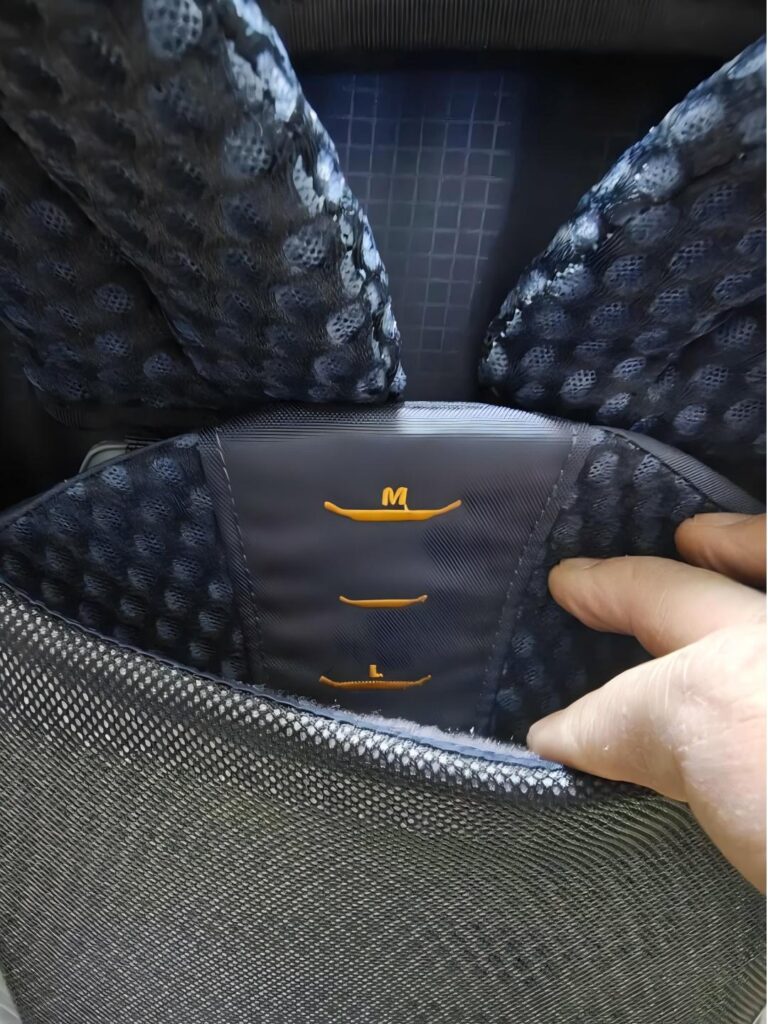
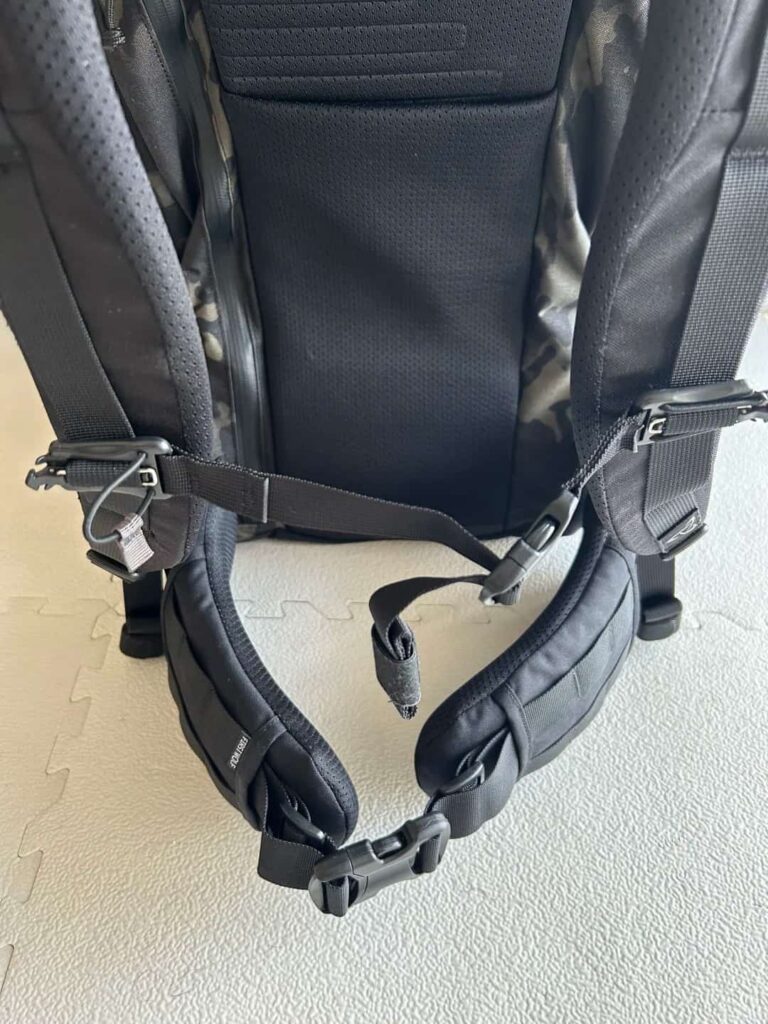
The takeaway is this: once you get this fitting thing right, backpacking transforms. The miles feel shorter. The views look brighter.

Your body thanks you. A properly fitted pack makes you feel powerful and capable, not defeated.

So please, take the time. Adjust your pack carefully. Your future self, striding comfortably down the trail with a smile instead of a grimace, will thank you.

Now get out there. And maybe just bring a flask instead of the beers.

Leave a Comment

Your email address will not be published. Required fields are marked *

Scroll to Top